Showing posts with label crafting. Show all posts

Wednesday, March 16, 2011

Beautiful Beads and Another ETSY Giveaway!


What girl doesn’t love pretty beads?

DSC_1102

My daughter can spend hours making bracelets, necklaces and various craft projects using her jar of pretty beads.

So, she was really excited when I told her we would go over to my friend Jenny’s house to pick out beads for a necklace, bracelet and anklet for her birthday.  I’m pretty excited myself because I’m going to have Jenny make me something, probably an anklet and matching bracelet set, since I have a fettish for them!  For me beads are like buttons…you can never have enough of them! They are so beautiful and unique!

Jenny is a fellow Etsian! She is a beautiful lady with a precious heart, a hilarious sense of humor and a talent for making gorgeous jewelry.

Let me show you a few of the beautiful items you can find at Janderjools!

  There are necklaces that are beautiful, unique and stunning.

 janders-3 jander-8

jander-4jander-9


You’ll find earrings that will dress up any outfit.

jander-5   jander-11


And braclets! Oh we can’t forget all the beautiful bracelets! I’d buy every single one if I thought that Mr. Hollywood wouldn’t have me committed!

jander-2jander-12

jander-10 jander-13

Jenny is graciously giving my readers a 25% discount on the items in her shop for the rest of this month.

TWENTY-FIVE, Ladies! 

You have to go check out her shop! Mother’s day is coming and Janderjool’s jewelry would make a perfect gift! Plus with the summer month’s right around the corner it would be a perfect time to pick up something for yourself to wear with you pretty summer outfits.

When you check out just type in SPRING25 to receive you discount.

AND as an added bonus~ Jenny will put everyone’s names who buys from her shop this month, into a drawing. The winner will win their choice of anything in the Janderjools shop!

A great discount and a chance to win a piece of beautiful jewelry what can be better!

Now head on over to Jenny’s and give her some love! ♥

Wednesday, February 2, 2011

Sometimes


It is a grand joke where my husband works that whenever bad weather arrives all the kids except for those who attend Juniper Hills Academy (our homeschool) will get a day off from school.

Yeah…I guess I’m known for being a stickler.

We have NEVER taken a snow day, but something weakened in me on Tuesday when I promised the kids that if we got A LOT of snow they could have Wednesday off.  The weather man didn’t lie.  We got quite a bit of snow and a WHOLE lot of blowing and drifting. 

snow-1


Sometimes even homeschool kids need a snow day.

 valentines activities

So, we spent the day making yarn hearts and rock candy and sugar cookies and home made rolls.

When we weren’t being crafty or busy stirrin’ up something in the kitchen, we were being lazy.

But, hey, that’s what snow days are for…Right!

Tuesday, November 23, 2010

Counting

swamp flowers and water droplets


Praise the Lord.

Praise the Lord, O my soul.

I will praise the Lord all my life;

I will sing praise to my God as long as I live.

Psalm 146:1-2


We’ve been counting our blessings these past few weeks.  Counting, recording and displaying.

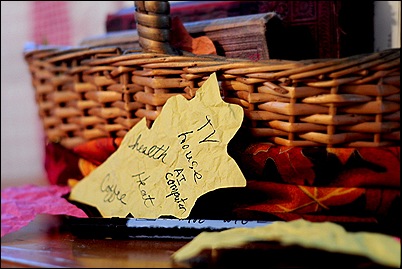
Simple handmade leaves and pen are at the ready for anyone who thinks of a blessing.

DSC_1407-1


When a leaf becomes full on both sides it joins the rest. Strung across across our sliding glass door on a length of jute.


DSC_1408


Our thankfulness garland is filling up.  Reminding us of the Lord’s unending blessings.  We truly are blessed.  And through this display, made by our hands and hearts, I am hoping my children grasp deeply the Savior’s love for us.


Want to make your own?  It is SO simple.  Gather some fall colored construction paper.  Spray it with water, just till damp.  Crumple the paper into a ball and scrunch it good.  Undo the paper and lay flat till dry.  Trace leaves on the paper and cut out.  That’s it, you now have paper leaves with a neat texture to record your blessings on!

For another article on recording blessings visit me At the Well.

Wednesday, March 17, 2010

Sun Catcher


100_7969A few weeks ago I broke out the coffee filters and markers. I had initially thought of it as a project for my daughter, since she is ALWAYS begging to do art. But, before I new what was happening a swarm of boys descended on the dining room.  Everyone was clamoring for a coffee filter and some markers.  Thankfully after 8 years of homeschooling there are no shortages of markers in this home!

For the past 2 weeks our amazing disks of color have sat on the school room table waiting for inspiration. 

100_7793 100_7794

Finally, it came to me…Sun Catchers. This was a perfect craft for all ages. My 13-year-old son, right down to my 3-year-old daughter enjoyed it.

Here is a list of materials needed:

White coffee filters

Markers

Water

Eye dropper or spoons

Colored computer paper

pencil

exacto knife

hole punch

Step 1:  Have your children color their coffee filters. 

100_7961


Step 2: Once they have filled their coffee filter with color place it on a cookie sheet and let them wet it down.  We used an eye dropper but you could use a spoon.  Get the whole filter wet. Just damp is fine, there is no need to soak it! Watch those toddlers, they love water! :)

100_7962

Step 3: Let the filter dry.

100_7968 

Step 4: Let your child choose two pieces of colored computer paper.  Lay one on top of the other.  Place a dry coffee filter on top of the paper and trace a circle that is about 1/4 of an inch bigger than the filter onto the top piece of paper.  Now you can draw your design.  I did my daughters free hand, but the boys decided to use stencils. Make sure to keep your design away from the edge of the circle about 1/4-1/2 inch.

100_7957 100_7971

Step 5: Using an exacto knife cut out your design, making sure to cut through both sheets of paper. ***Make sure you do the cutting on a cutting board. I found that the cutting part was a bit difficult for my younger boys. I ended up doing most of it, but they were still really pleased with this project.

100_7958

Step 6: Holding tightly to the papers, cut out your circle.

Step 7:  Using a glue stick, smear the inside of one of the paper circles with glue. Lay down you coffee filter.  Glue the inside of your other paper circle and place on top. I found that if I took this over to the window and held it up against the glass I could see to line up the top circle with the bottom circle.

Step 8: Punch a hole in the top. Run string through and then tape up to the window.

100_7975

Gorgeous!

And with all those leftover, color-saturated, coffee filters you can make your daughter a fairy-princess-flower-wand.  She will be delighted.  See…

100_7985


Well, maybe if she gets to say “Monkey” while you take the picture it will help!

100_7982 

Craft on!

Friday, December 11, 2009

When the Weather Outside is Frightful...


This girl hunkers down.

It was a whopping 7 degrees yesterday and the wind was whipping snow tornadoes across our back yard.  I was supposed to take Caleb and Lauren to the doctors office, which, by the way  is an hour away.  I called and canceled.  I love the snow and the beauty of the winter season, but I don't do well in frigid temps.  I suffer from frost bite on my toes(sometime I will share the story on how I came to be the owner of malfunctioning toes) and they turn hideous colors and swell if they get cold.  S-o-o-o, now that you know a bit more about my toes than you wanted to! Anyhoo, all that to say...I won't be going out for the next few days!

Since, I wasn't going to be leaving the confines of my home, while the wind was bending the trees and the snow was swirling across open areas,  I kicked into crafting/cooking mode...

100_7141

These are the best Peanut Butter cookies EVER!  I remember my grandma always had these or her Soft Molasses cookies in her cookie jar when I was a little girl.  If you would like to see if I'm right about how good they are, I have posted the recipe here.

And since it was so bitter cold what could be better than a big pot of soup and homemade bread to go with it?

100_7002

While I was at it, I decided to do a little crafting. A few days ago I found the most adorable tutorial for these little birds.2009-12-12

The past couple of days I have been working on them off and on when I get a few spare minutes.  I have decided that these will make wonderful gifts for some special ladies that I know. If you decide to make them here are a few pointers

  • pin your pieces as you work around. It will make your hand sewing much easier
  • I used fabric glue to adhere the eyes instead of sewing them on, just to save myself a little time.
  • If you want to hang your birds like I am doing with some of mine just attach some ribbon at the back of the birds head with fabric glue

And there you have it!

Today, I will be cleaning and candle making and shuffling around my home with slippers, keeping my feet warm as toast.

Have a great weekend!


Jenn

Sunday, December 6, 2009

When the Garden Dies...

When the weather turns cold and my gardens are shriveled and brown, my hands turn to crafting instead of digging, pruning and watering.

Over the past month I have done a few projects here and there and I have a few more I really would like to accomplish, but so far this is what I've done...

~A poofy, variegated tutu for Lauren.

2009-11-22

~A couple more little boy ear flap hats, Christmas stars (you can find the pattern here), crochet flowers to decorate my bulletin board (find pattern here), and a mug cozy for my endless cups of tea and coffee!

2009-11-213

~And finally I got around to covering the lampshades in my bedroom.  They were in desperate need of a pick me up!

2009-11-15

Now, its on to a few more crochet projects, another covering of a much needed object and finishing of a couple projects I started last spring!

*Thank you so much for the comments you left for me.  I am feeling much better.

 Jenn

Oh and one last picture to show you my new teen who just keeps growing and growing  (I am 5' 6")!

100_7085

Wednesday, October 14, 2009

Fabric Pumpkin Craft

We have a 4-H open house coming up in a couple of weeks and our club is setting up a table to help promote 4-H to children and their parents.  I need to come up with a make-it-take-it craft for these children to do when they come by our club's table. 

It has to be fast.

It has to be inexpensive.

It has to be cute.

And most importantly I don't want it to be a paper project that gets thrown away two days later. I want it to be something that the children and their parents can enjoy and display.

~Easy Fabric Pumpkins~

2009-10-13

I found this project several places on the web. One site was  Living Locurto. There are great instructions here. It is super easy, inexpensive, quick and cute. 

Materials Needed:

12x12 fabric squares

Paper towel or toilet paper rolls cut into 2-2 1/4 inch pieces

Plastic shopping bags

Sticks approximately 3 inches long

Hot glue gun

Wrap 2 plastic bags around the 2" piece of toilet paper roll. Hold this in place and set in the center of a square of fabric.  While still holding on to the plastic wrapped tube, take a corner of the fabric and stuff it down the center of the tube.  Continue taking up corners and stuffing them into the center until all fabric is stuffed into the center, glue if neccessary (I didn't find the glue necessary).  Finally apply hot glue to the bottom of your stick and place in the center of the pumpkin. 

Easy Peasy and adorable to boot!

Friday, September 25, 2009

Recyclable Art

100_6597 

We have been a whirlwind of activity this week.  We are steadily (thankfully not frantically... yet) finishing up our 4-H projects. This year we did a project in recyclable art.  I was extremely happy with the results! 

Since they turned out so cute and were very manageable for my 10 and 12-year-old boys, I thought I would share this craft with you. 

Materials needed:

Clean coffee, soup or any metal recycled can

Stencil or template

Marker

Hammer and nail

Candle

Wire for hanging

Spray paint

Step one:

Using your stencil as a guide, place dots on the can.  We used a star and  just placed the dots around the template so that the shape of the star would be recognizable.  If your really talented, you can freehand it or have your children make their own design.

Step two:

Fill your clean can with water (leave room for expansion) and place in the freezer.  Freeze till solid.

Step three:

Lay a thick towel down on a hard surface. (We just used the kitchen table.)  Place your frozen can on the towel.  Take the hammer and using the nail piece holes in the can where you placed your dots.  This was super easy to do. Since the metal was cold it pierced really easy.  I'm pretty sure young children could do this very easily with the help of an adult.

Step four:

Let it melt and then dry it off really good.

Step five:

Spray paint. Let dry.  We applied about 2 coats.

Step six:

Run a wire handle through the top.  **Don't forget to punch holes for this while the can is frozen.  We did forget on one and it was pretty hard to get holes in after the can had thawed.


We were able to make every bit of ours from recycled materials.  We used paint from a previous project.  Wire that Joel's work place was throwing out. And candles using recycled glade candle holders and chunks of old pillar candles. 

100_6600

The last thing I did was to put velcro (the very thin variety) on the inside bottom of the can and on the bottom of the candle so that the candle wouldn't slide from side to side.

And there you have it, a pretty luminary! I'm might just have to throw a bon fire party, so that I can hang these beauties up in one of our trees and watch them glow!

Friday, June 5, 2009

God's Designs


100_5442


Nine years ago I started making candles. I quickly found that I truly enjoyed crafting various candles and getting creative with the process. Grand plans furiously took hold in my mind and heart. I decided I was going to go into the candle business!  I would sell my creative and lovely smelling creations and make a small, but substantial income in the process! Well, after a couple of craft shows and a few hundred dollars, I began to realize that there were a lot of people out there making candles on a much bigger scale then I ever could. My plans for grandeur fell FLAT.

I came home from those shows deflated. All I wanted to do was help add a bit of income, so that we wouldn't always be living pay check to pay check. I had just recently resigned from a teaching job so that I could stay home with my boys.  I felt guilty for not contributing financially as I had before. I wanted to be able to help even if it was $20 dollars for groceries here and there.

Well, my dreams of being a grand candle maker never came true. I have resigned myself to that.  I have come to know that it wasn't God's design for me. His plans for me were to include so much more than I could foresee.  I was to become a homeschool mom, a mother to two more children, plus continue in the roles of wife and homemaker. 

When I finally opened my heart to God's leading, I found peace. God's plans for my life where not the dreams I had. They were something much bigger and grander. Before I made the decision to let God lead, I was always leaning on my own power. How could I make life better for my family? How could I earn some extra money? How could I, how could I, how could I.  When I ran out of strength and turned to the Lord, He pointed me in the direction of my family. I found the path God had laid out before me. Down the path I found happiness, peace and fulfillment. God wanted me to put my focus and strength into my family, not into my dreams of creativity and money making schemes.

I still like to take time to be creative. I still dream of what I can make next. Honestly, at times, I still envision making money off of my creations. But, I have learned that these must not take precedence over the Lord, my relationship with my husband, my love and care for my children or my service to others.

100_5441 

Nowadays I make candles just for my family and to give away as gifts. I'm okay with it. Probably if I was a grand candle maker I would really dislike candles! Since I am not a candle tycoon, I can enjoy making them, enjoy sniffing them and enjoy lighting them with my husband, children, family and friends!

God's designs are GOOD!

Sunday, May 3, 2009

Crochet Craziness

Since I have had to spend a lot of time just lying around, I decided to entertain myself by doing a little crocheting. Here are some of the projects I have finished.

These are three of the rose ponytail holders I have made. They look really cute in Lauren's hair.


This was my first attempt at crocheting a toy. I tweaked the pattern a bit and I really shouldn't have! It was trying to make it a floppy eared rabbit. It looks a bit too much like a dog. Oh well, the important thing is that Lauren loves it!

This is a set of baby washcloths. I made each one different and I love how they turned out. I might try to sell these on Etsy or maybe I'll keep them to give away in the future.

Here's another ponytail holder. This is a little bigger than the roses, but I still like it.
And finally one of the projects I am working on right now, a rag rug. I started this yesterday morning. It took me a while just to get this far, because I am cutting scraps into 1/2" strips and then hand sewing them together all while lying on my back! I have wanted to make a rag rug for a long time now. I am hoping this one turns out the way I want it, because I already have a spot in mind for it.

Thursday, April 30, 2009

Easy Spring Tree Craft

I started this project way before my back went out and landed me in bed. Thankfully for the past two Fridays I have had a sweet friend come and be a mother's helper. Megan is 17, homeschooled, my boys piano teacher, a sister to five brothers and two sisters, an awesome cook(she made a "fancy lunch" for the boys last Friday- eggs, pancakes, bacon, and toast!), and a wonderful helper! She successfully kept my four children in line! All while feeding us and cleaning my house. Plus she helped the boys finish the Spring Tree craft we had started 6 weeks earlier.

This is a super easy project so even your littlest one can make a pretty spring tree.

  • Start with a sheet of heavy paper. We used watercolor paper, but you could use cardstock instead. Have your child draw a tree (or draw a tree for a younger child) and color it in with a brown crayon, leaving as few white places as possible.
  • Next take a cheap watercolor set and paint the rest of the paper a light blue.


  • While your page is drying cut out squares from white and various shades of pink tissue paper.
  • When the paint is dry attach your tissue paper. Place a pencil in the center of a square of tissue paper. With your fingers push the sides of the tissue paper up and twist it around the pencil. Remove the tissue paper "bud" and glue it to the tree.


This is the one my two-year-old did with a little help. If you twist your squares tightly around the pencil they will stay in the shape of a "bud". These are a little loose, but still make for a pretty spring picture!

Saturday, January 31, 2009

Make Your Own Calendar

A few weeks back Kristen from We Are THAT Family held a giveaway.  The prize for the winner was a vinyl calendar that you placed in a frame.  Once in the frame you used a dry erase marker to write the numbers and any information you would need on the glass.  

I loved this idea!

Since I didn't win and I was in desperate need of a calendar, I decided to make one that uses the same concept.

This is what I came up with...

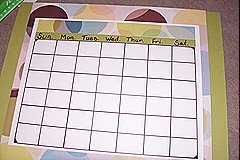
1. On card stock I drew out a basic calendar with a ruler and a black sharpie.

100_4318

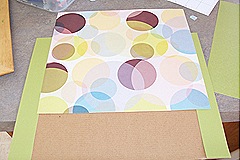
2. Then I removed the cardboard from the back of an old picture frame I had laying around.  To this I stuck on some pretty scrapbook paper.

100_4298

My cardboard was bigger than my 12 x 12 sheet of paper so I cut some strips of coordinating green card stock.

3.  I took a strip of the green and placed that on my calendar and then on top of that I stuck a strip of the circle paper. I wrote the days of the week across the green strip. Then stuck the calendar on top of the paper covered cardboard.

100_4320

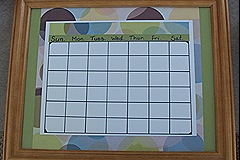
4. I tucked it all into the frame...

100_4300

On the glass, in a vis-a-vis pen I added the numbers, the month, all my important information and Ta-Da...

A Calendar

100_4301


TuesdayPrayerButton3[1] ***I just read that Tuesday a precious two-year-old little girl who had been battling cancer went to Heaven yesterday.  Heather of the EO is giving a dollar, to the family,  for each comment that is left on her post about Tuesday.  Please take the time to post a comment. Then join me and hundreds more, who are praying for Tuesday's family as they grieve over her death, but rejoice that she is safe and pain free in Jesus' arms.

Related Posts Plugin for WordPress, Blogger...